Hennock was inspired by my eldest daughter whilst sat on the platform of Staverton Station in Devon.
In an effort to get away from Ready to Run I chose 3mm scale to model this layout having previously exhibited a large Tri-ang TT layout. I hope the ramblings that all to frequently appear will be of use to you no matter what scale!
The track diagram shows a simple passing station with a couple of sidings. All track is PECO Hom-12mm gauge with turnouts operated by the wire in tube method. Control is provided by Gaugemaster HH with feedback.
Locos are mostly whitemetal kits running on etched chassis powered by Mashima 9/16 motors with Branchlines 40:1 gearboxes. Wheels are Markits with the latest 3mm Society products being introduced.
Coaches consist of Society 'B' Sets and coaches from etches by Worsley Works, Brynkits and 3SMR. A vast range of wagons are from the 3mm Society list with Finney and Smith providing the China Clay , Gunpowder and a few etched kits.
Hennock has appeared in Railway Modeller and Model Rail.
Please visit the links to the left - 3mm is the Premier Scale for modellers-

Hennock

Hennock
General view of Layout.The facia has since been varnished.

The Degree Inn

The Degree Inn
In recognition of my eldest Daughter's achievement. She is also the one who gave me the push to build the layout.

14XX and Autocoach

14XX and Autocoach
Shows Station building-based on Staverton.

Hennock Track Plan

Hennock Track Plan

Thursday, June 30, 2011

Brake Vans

 Three Brake Vans ready to be glazed, have the roof's & wheels fitted, weighted and have couplings attached.
The Midland van is unfitted and really didn't appear in Devon. However, it's my layout and I didn't see a photo that it didn't happen!
The top BR Brake is a fitted version, needs hoses as well attached. I am pleased with the way this van looks with the handrails picked out in white. This was achieved by sliding some greaseproof paper behind the rails before painting. This has the advantage of some paint adhering to the rear of them when you slide the paper out before it dries. Do only use
greaseproof paper,or the backing off sticky labels, these will not attach
themselves to the paint.
 The third van has black background to the numbering. This is correct and something I picked up quite by accident. There are many photos on the
web showing these anomalies and are well worth spending a little time investigating.
Well, must finish these three before I move on to some coaches.

Wednesday, June 29, 2011

First coats of paint.


 Both Brake Vans and the Mechanical Horse have recieved their first coats of paint.
Railmatch Matt Black was used for the underframes on the vans and chassis on the Mech. Horse.
For the concrete weight on the BR Brake Humbrol Matt 31 was the colour selected, this can be dry brushed with a fawn shade later to break up the uniform colour. Both the verandah floors were dry brushed with dark brown tto add a bit of texture.
The Mechanical Horse is Railmatch Crimson and Humbrol cream. The crimson will need a second coat as the coverage is not that great.
Hopefully tomorrow these coats will be dry so that the vans handrails can become white and the transfers applied later this week.
I will use some old Woodhead transfers for the BR van, I feel these, with ready made numbers are possibly the best, unfortunately no longer produced, Midland numbering will be from 3SMR transfer sheet for pre-nat brake vans.


Tuesday, June 28, 2011

BR 20T Brake Van

 Life taken in both hands to fit the horizontal handrails.
First lengths of nickle silver wire, .33mm , were cut to size. Thin card was cut to rough size to pass through the upright handrails. The wire was held in place and a very small amount of  flux was applied to the joint. Soldering iron tinned with a small amount of solder and quickly applied to the joint. The top picture shows the flux residue after soldering. I won't be bold enough to say that every one worked first time, it didn't.Some of the handrails are not exactly parallel to the sides wich made lining up tricky. However, after a couple of tries each van now has its handrails complete. Also there is no damage to the sides of the van.
Next job is to thoroughly clean the bodies of flux and then they are ready for the paintshop.


Monday, June 27, 2011

Painting

 These have all been to the paint shop (glorified name for the shed). After covering the turntable with clingfilm, the Midland Brake Van, Mechanical Horse and the roofs for the two BR Brakes have been primed/undercoated with Simonize undercoat.

The roofs will be given a spray of darker grey and the MR Brake just needs the underframe painting black. I usually useMatt black for the underframes. The handrails on the Midland Brake will need picking out in white
The Mechanical Horse must be brush painted, will be red and cream as I can find no picture or mention wether they ever recieved Maroon livery.
The next job is to solder the horizontal handrail to the BR Brake vans, then they both can visit the paintshop.

Sunday, June 26, 2011

MR/LMS 20T Brake Van

Chassis, wheels and roof ready. Will remove wheels for painting. Using grey undercoat which will suffice for the main body colour.
The roof will be a darker shade. The rainstrips I hope are right as, per usual it, is hard to find a photo of the top of wagons so thios arrangement is from a diagonal strapped van as on Paul Bartletts excellent collection.
The roof as supplied is suitable for either duckets or no duckets, there are two stove chimneys, removing the centre one is correct for this model.

Saturday, June 25, 2011

MR/LMS 20Ton Brake Van

 Have now got to the stage of assembling this kit. The handrails are located by pips formed on the sides of the van. I find it hard to keep handrails straight using this method so, as I did with the GWR Brake, I am locating the handrails between the pips.
Using fine plastic rod, this was meked into place as seen in the pictures.
The lookouts were mounted on thin plasticard as suggested in the instructions and will be glazed once the body has been painted.
I had considered glazing the lookouts before painting but thought that masking  would prove too difficult to remove. So I will try some PVA to provide glazing for these.
Next, the ends need to be attached and then the chassis after the pin point bearings have been inserted.

Thursday, June 23, 2011

Spray Mounts

Before spraying, I need to choose the best way of securing the model to be painted. I have built up, over some time, a selection of wooden mounting blocks. These usually are thin strips of wood, mainly offcuts, selected as a reasonable fit for whatever is going under the spraygun/can etc.
Squarely fitted to a base, the model is then attached with double sided tape to make sure it stays in place. This enables the model to be moved whilst the paint is drying and ensures stability whilst being worked on.

Wednesday, June 22, 2011

BR 20T Brake Van

 Well, both brake vans have reached the fitting out stage. The holes in the buffer beams have been opened out and the cast buffers fitted. Next to do is fit the handrails. Holes 0.3mm have been drilled for the handrails and the first four have been attached to one side. Having fitted the eight on the sides, there are four more to be attached from the buffer beam to the front of the guards veranda, the longitudinal rail will need fixing between the inner rails. This will be done by soldering . I did it that way on my first brake van, didn't damage that!
The lower photo shows one of the most useful pieces
of equipment I have. Bill Bedfords Handrail Jig must be one of my favourite tools. All of the handrails and coupling wires are made on this . I ensures precise bends in wire and can be used to measure handrail lengths.
I have no other interest other than a satisfied customer-Highly Recommended.


Monday, June 20, 2011

Morris Commercial Van

 Another White Metal kit is this from Worsley Works.This will be the second one of these that I have made.  Eight pieces make up this kit which comes with no wheels. Well cast, this one needed a little cleaning up befor assembly can begin. The lower shows the chassis, the hole for the seat has been opened out to accept the mounting spigot. A notch has been filed into the springs to make attachment of the axles easier and a little of mechanical strength.
Just need to find some suitable wheels now, I think I have an old Matchbox lorry somewhere which should be a suitable donor.
I must also find some suitable transfers to adorn this one, I have enough plain sided vans!

Saturday, June 18, 2011

Scammell Mechanical Horse

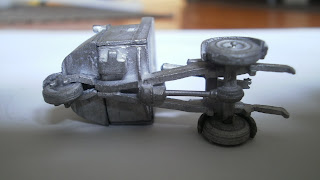
 Thsi white metal kit comes in 17 pieces and are very well cast. A small amount of cleaning up is needed to ensure a good fit.
Assembly took me about a couple of hours to reach the condition you now see. Unfortunately I broke the window surround from the bonnet casting but will actually aid glazing later. This shot shows the underside of the tractor unit, the detail is really quite good for a model which is not much more than 11/2 inches long.
 The trailer can be made with the jockey wheel in the down or raised position. As I already have one with the jockey wheel down this one is coupled together.
The mudguards are located in a hole drilled into the chassis, a mark is already there for guidance. Just visible in the lower right hand corner is the numberplate holder, it even has the light for illuminating the numberplate cast on.
The almost complete model, needs cleaning before being undercoated in grey primer. Them I will use brushes to apply the varios colours. It's easier to brush on such a small model, interior will be cream, floor grey and body Maroon. I hope to find some transfers small enough to apply the fleet number on the cab door. All that needs to be done is fix the bar in front of the bonnet and then painting can commence

Friday, June 17, 2011

Pullman Carriages

 This kit I got from Worsley Works some time ago. It will be used as a camping coach initially. It is actually 'FINGALL' but the sides are wrong until I found the right ones.
All of W/W coaches come as sides, ends, chassis and a roof. The first three are etched brass and the roof an Aluminium extrusion.Seen here are the component parts. The chassis has had the sides bent up through 90 degrees , these help hold the sides square. The solebars have been soldered in place, the centre parts haven't been folded down yet as I need to trim the chassis to length.
The second photo shows the vestibules have been folded and tabs soldered into place. These fit on top of the chassis and have the two sides soldered to them . Then the chassis can be trimmed, the buffer beams attached and centres for bogies drilled out if the etched ones arn't in the right place.
Soldering these kits together is simple as they almost always fit as they are designed to.
 Society Compensating 10ft Bogies will be made, these are a lovely etch by MJT. Right more building then the lot must be put away for the next modelling session-at least I know where it will all be.

Thursday, June 16, 2011

My Work Box

Where does all the work happen. Mostly in the attic where the layouts are made/ stored. However, I felt a bit antisocial, plus it gets cold up there during the winter.
So I had a nod about some boxes that Sainsburys (Other supermarkets are available) were selling. Then a trip to IKEA found some trays that were a decent size. These trays, wooden, will enable several Business card boxes to fit in them. The business card boxes just hold a 3mm kit and instructions. Three of these trays fit intothe box plus my portable workbench with cutting mat. The compartment box I picked up at Morrisons last Tuesday, for a couple of pounds. Most models fit the trays until they are finished ready for painting plus its all kept tidy.

Wednesday, June 15, 2011

Couplings

Here, just to the right of the crane is the uncoupling wire. Hard to see, that was the object of the exercise.I did experiment initially with a clear perspex ramp bu it was too strong and had the effect of lifting the wagons or stalling passing locos.
At the moment,'Hennock' is stored so I cannot show the uncoupler with a wagon, but when getting ready for the next exhibition I will photograph how it works.
As you may guess, i am getting better with the camera, I am especial;;y impressed with yesterdays close up of the finished coupling. Bear in mind the unit is only 12mm in width so I am getting better!

Tuesday, June 14, 2011

MR/LMS 20 Ton Brake Van

Next on the agenda is this Cambrian Models Brake Van produced for the Society-Code CA. The s vans were made by both the Midland Railway and the LMS between 1919 and 1931.Seen over a large area of the rail network they lasted until the early sixties when the majority were withdrawn.
Various choices are possible with this kit, plus there may be variations gleaned from photos.
This one will be finised as an unfitted version in BR grey.
Extensive instructions are supplied with the kit, 9mm disc wheels,couplings, paint and transfers are required.

Monday, June 13, 2011

Couplings

 To attach each piece of rolling stock to another I use a Worsley Works etch. These are called West Harptree couplings, so called because they were developed for use on Mike Corps layout of that name.
Consisting of a two part etch, a hook and a carrier/pivot, these can be obtained in brass or nickel silver. They are very much like the Anita couplings produced by peco/ Tri-ang for many years. They are much finer and closer coupling can be achieved.
Firstly a brass pin is passed through the dropper on the hook and soldered. A half  loop of phospher bronze wire is formed and attached to the carrier with a short upright piece soldered to the left side, this to prevent buffer lock when pushing. A pin is passed through the pivot to make the finished coupling as on the left. I usually batch build these with the other coupling for each piece of stock just having a half hoop and upright.
Uncoupling is by a wire between the rails biased to one side, this is allowed to move in a loop at the other end-when under tension the couplings ride over, when reversed the wire lifts the coupling thus allowing stock to be parted.

Sunday, June 12, 2011

BR 20T standard brake van.

 Back to some modelling. This kit has been around for quite some  time but nevertheless is an excellent one to build.Two are being built, both will be finished in BR Bauxite as fitted vans. First the floor of the body and the solebars , this to help when placing the two together. The axleboxes are opened out and countersunk for the bearings to be fitted as flush to the solebar as possible.One solebar is fitted, remembering to use the centre marks to align, and left to dry. Whilst doing this, .3mm holes are drilled in the body to accept handrails. Very fiddley but the end result will be worth it.
The second solebar is attached, with the wheels fitted, ensuring that all is square and the wheels revolve freely. I usually try to build two wagons at a time, gives something to do whilst the glue cures, by the way I use MEK from Barrie Stevenson.
Whilst all is drying the roof has a couple of holes drilled to take the vents, whitemetal castings in this case, some plastic ones are provided but don't look so good.
Headstocks and end platforms are then fitted with cast buffers superglued into the opened out holes.
More on this soon when we come to the fun of fitting brake shoes/hangers.

Saturday, June 11, 2011

Difference in scale

Another from the archives. This shows the difference in size between a 4mm late cab Pannier on the left  and its 3mm counterpart. The Bachmann model has helped in detailing its 3mm cousin.
When one considers the difference in size and the level of detail that can still be included, it gives an idea into what can be achieved in 3mm.
If a layout is built to a 4mm plan in 3mm, it gives a much more realistic feeling of space. Indeed, one of my operators who helps me with 'Hennock' usually brings an example of 4,3 and 2mm wagons to demonstrate the difference.
Add to this the extensive range of rolling stock, scenics and the huge range of wheels available to the 3mm modeller and it can be seen what can be achieved in 3mm. The 3mm Society has just announced a range of wheels that have a square moulded centre to fit macined axles which quarter so easily. Reminiscant of the Romford type, they are much finer and easy to fit.

Friday, June 10, 2011

Autotrailer W225W

Hawksworth Auto Trailer (or Autocoach if you prefer) was built to diagram A.38 Lot 1736 in 1951. fitted with 9ft bogies, 13 of this particular lot were built and were 64ft long. There are three of this diagram on the South Devon, although on of them, number 232 'Clair' has had a gangway fitted at the non driving end.
Now, a question. This coach was built after nationalisation so should it have the W suffix? I am led to understand that only pre-nat built coaches had a W after the number. Is it because it is to a pre-nat diagram? Answers or reasons would be gratefully accepted.

Thursday, June 09, 2011

South Devon Pannier

Another picture from the South Devon. This time an outside cylinder Pannier, the only surviving example of Collett's 1366 Class. Built to work around sidings and tight curves of docks, 1369 spent most of her time at Swindon. Then in 1960 was transfered to Weymouth to work the harbour trains, fitted with a bell to warn other tramway users. Spent rest of her life working China Clay trains. Bought from BR by the then Dart Valley Railway for around £650 so I believe. Beautifully restored the loco makes a lovely sight waiting for the signal to move off destined for Totnes Riverside.

Wednesday, June 08, 2011

Buckfastleigh Signalbox

Following on from the last post, this shows the other side of the line. The picture is quite useful showing the point rodding emerging from the boxes' switchroom. Also you can see the rodding crossing the tracks underneath the rails. I think I am right in saying that this box is a new build for the South Devon, I don't remember it in this position when the then Dart Valley first re-opened.
So, lots of detail, most useful when coming to build the box for Teignford.

Tuesday, June 07, 2011

Token Exchange

Looking through my files I came across this gem. Taken at the South Devon Railway during 2009,it shows the token exchange apparatus. This is sited opposite the signal box which itself is positioned adjacent to the footbridge. I am not knowledgeable enough to say what the various items are but will have to carry out some research to see wether this type of equipment would be suitable for Hennock or Teignford. It would seem a fairly straightforward modelling excercise using plastic offcuts plus some fine mesh.

Monday, June 06, 2011

Memorial Wagon

This is a special wagon. It came into being because of a bequest from the estate of John Fisher.
John was a long standing member of the 3mm Society and was also involved with the Cutty Sark and was involved when the damaging fire engulfed it.
The Society decided that this wagon was a fitting tribute to John who had a keen interest of the GWR.

Made by Cambrian it is a GWR Diagrams 022 & 023 12 Ton 5 plank open. Easy to build with crisp casting the kit is so easy to make, I made two in an evening. Painted in post-nat unfitted grey, the only thing to be made by me was the sheet rail. This was a length of brass rod bent to the right dimensions and attached to the supplied end mouldings. Conversions possible are to Diagram 025 which was a grain carrier conversion. Much useful info can be found in 'A History of  GWR Wagons' by Atkins,Beard,Hyde & Tourret. Russell  published a tome on wagon drawings-both of these books are very scarce.

Westfest 2011

I have at long last finalised the details for this years 3mm Scale Westfest which is being held in Bournemouth.
Six layouts drawn from South Western area groups, this years show will include Steelworks, Llams-y-nit, Hollow Fosse, Yeoton Wharf, Dunkton Coombe and a tram layout-Lambeth Walk.There will also be a layout in progress with modelling demonstration.
Also attending will be 3SMR specialist trader, Tom Rayner- The Weatherman and Peter White demonstrating wheel assembly. For 3mm Society members the Society Shop, Track Sales and a limited Secondhand Sales.Due to tax reasons these are not open to Non-Members but you can join on the day for an annual subscription of £20.
There should be ads in all the mainstream magazines which echo the show details-
Saturday 17th September. Corpus Christi School, Christchurch Road, Boscombe Bournemouth BH7 6AN ( visitors car park) Open from10.30 till 17.00 there will be light refreshments available and, wheelchair access is to all areas. Admission is £2 per person.
Many of the demonstrations are applicable to all scales as well as gauges.
Hope to see viewers of the Blog attend, please make yourselves known-criticism is always welcome !